Are you preparing to purchase a burial vault for a loved one? Maybe you have recently been to a graveside funeral service and the burial vault captured your attention. Or perhaps you have an inquiring mind and appreciate knowing how different products are made.
No matter what sparked your interest, we are glad you found this blog.
Our objective is to not only tell you how to pour a burial vault, but to also shed some light on why different procedures are carried out in a particular way. You will soon find out that the actual pouring of a vault as well as what occurs beforehand and afterward are quite involved.
It is necessary to know we will be discussing lined, sealed and warranted burial vaults which are not to be confused with outer burial containers that do not include these elements.
Outlined below is a summary explaining what happens during each stage of the pouring process. As you are reading, keep in mind that some methods and techniques will vary based on product brand.
Liner Preparation

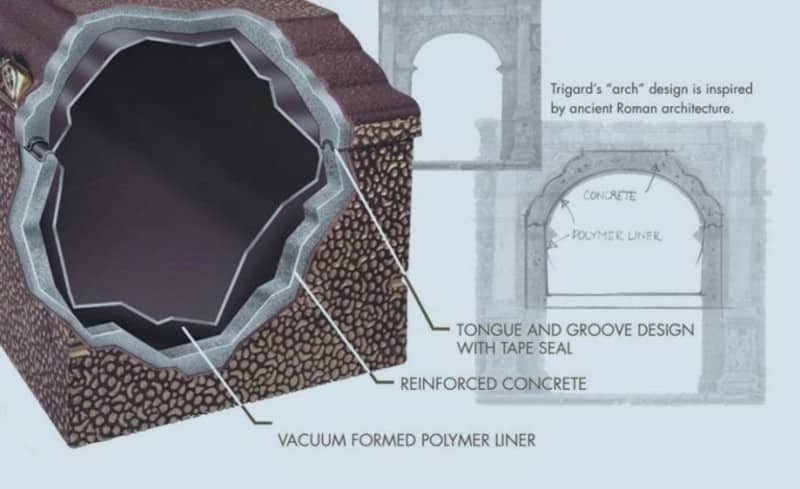
Every vault has a vacuum formed polymer liner that helps protect against exposure to outside components so a clean, dry casket space can be maintained. A liner also helps contain any harmful elements within the casket so they are not released into the environment.
Prior to pouring, a special glue is applied to the exterior surfaces of the liner’s lid and base. This glue reacts to the water in the concrete creating a strong chemical bond with the liner.
Setting Up the Mold

A burial vault mold is a steel form used to hold the polymer liner in place when concrete is being dispensed and while it dries and cures. A mold has three separate parts; an exterior shell, an inner core, and a lid.
For a mold to be set up, a hoisted turning bar lifts and moves the mold’s shell from its core. Next, form oil, a release agent, is applied to the interior of the shell to prevent the concrete from adhering to the mold.
The exterior mold is then adjusted to accommodate the correct amount of concrete and returned to its base. The bottom of the liner must now be turned upside down and placed over the mold’s inner core.
Gasket and Lid Mold
All burial vaults have a butyl tape seal that aids in safeguarding the casket. To install this tape seal, a coat of primer is brushed into the tongue and groove structure of the lid. Once dry, the gasket is gently pressed into the lid’s indentation forming a seal between the top and bottom of the unit.
To prepare the lid mold, form oil is applied to the inner surfaces of its sides and ends. The liner is then placed over the mold so its ends and sides can be raised, locked, and adjusted.
Final Preparations

Certain decorative features and/or personalization options may need to be installed before concrete is poured.
Top tier vaults will sometimes have an outer polymer jacket with a simulated stone appearance. It is positioned inside the mold’s shell and offers an extra layer of protection. Trigard offers four styles of jackets that have intricate moldings and distinct columns giving them a timeless look.
A vault may also have aesthetic enhancing decorative handles. For these to be installed, the mold must be pre-drilled, properly positioned, and mounted into lead anchors.
Included with some vaults are covers and interiors made of stainless steel, bronze, and copper that offer an extra layer of protection and add eye appeal. An interior metal lining is placed over the inner mold surface. Coordinating covers are set to the side and positioned on top of the unit once pouring is complete.
Dispensary Options
The decision to use ready-mix or batch concrete must be made ahead of time. The rate at which the concrete is to be delivered must also be predetermined to prevent any spillage.
There are three main methods to distribute concrete into a mold:
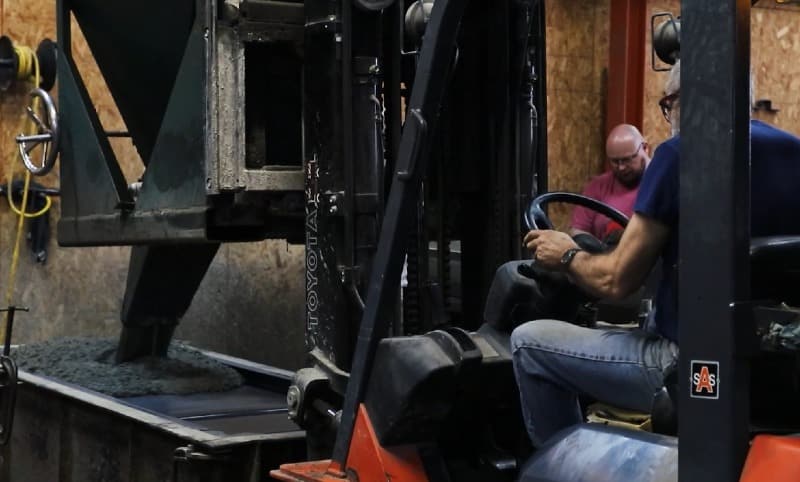
- Many plants use forklifts with attached concrete hoppers that move from station to station. Hoppers have swivel chutes and taper down allowing its contents to be evenly distributed.
- Another viable option is to use a mobile, round overhead hopper that is hooked to a chain and mounted to a mobile hoist.
- Some larger locations have ready mix trucks that drive through the plant dispersing concrete via a chute hanging from the back of the truck. This technique allows the most vaults to be poured in an allotted time frame.
Base and Lid Mold Pouring
To form the bottom of a vault, concrete is poured between the mold’s exterior shell and its inner core. One laborer usually oversees the process and upon completion, ensures the concrete is level. Either a mechanical stick vibrator or a traditional saw is inserted into the mold’s side pocket and maneuvered around its perimeter releasing any trapped air bubbles.
The base is actually poured upside down and takes roughly 2 minutes to fill. When completed, its foundation is approximately 2 inches thick. The end and side walls are between 1 ¼ to 1 ½ inches wide.
The lid of the mold is filled in a similar manner to its base. The main difference being reinforcing rods are added to the sides of the mold to strengthen the unit.
Following the leveling, smoothing, and edging of its concrete, a vault must cure and harden. The time needed to do so depends on the concrete type as well as the temperature and level of humidity in the building in which it is stored.
Filling the Lid Cap
Unlike the rest of the vault, lid caps are not actually poured. Instead, approximately 8 shovels of concrete are manually distributed throughout the cap’s surface. The lid cap is then smoothed into the vault’s top. Afterward, a brush is used to give the lid a uniform, textured surface.
It should be noted that lid caps are filled a couple days prior to the rest of the unit. This enables the cap to partially dry so it can bond to the lid’s wet concrete.
Just one vault contains 2,300 to 2,700 pounds of concrete; enabling it to withstand the weight of the earth and heavy cemetery equipment.
Stripping Out the Molds

When the concrete is fully set up, the mold is stripped out.
In order to do so, the mold’s exterior shell is unlocked and set on wood supports. Next, a turning bar is attached to the mold so it can be lifted, turned right side up, and moved to another pair of supports. Lastly, the corners of the mold are unlocked and removed, revealing the bottom of the vault.
Stripping out a lid mold is fairly simple. Its sides and ends are unlocked so the top of the unit can be lifted and united with its base. Molds are reused after a thorough cleaning.
Finishing Touches

Once the concrete has cured, the exterior must be finished and sealed.
Some vaults are sealed with asphalt which provides a good primary coat for painting, stippling, and texturizing. Others are finished with a decorative latex acrylic paint that acts as a sealer.
Trigard was the first company in the nation to offer customization using colored graphics. This is accomplished by applying sign vinyl to either the top or side of the polymer jacket or to the metal carapace after the vault has dried.
The final step is to adhere any personalization accessories such as metal nameplates and emblems to the lid.
Not as Simple as You May Have Thought?
Quality and safety protocols are of utmost importance throughout every phase of the process. Plants that pour burial vaults are expected to abide by the rules and regulations laid out by the National Concrete Burial Vault Association (NCBVA).
The pouring and finishing of a unit plays a major role in its overall production, but it is not the only part. Manufacturing the polymer liner is an entirely separate operation. A burial vault would not be the superior product it is today without the skill, attention to detail, and workmanship required in every phase.
Believe it or not, you have been provided with a mere overview of how a vault is poured. With that being said, feel confident that you are taking away a good, generalized understanding of what it takes to pour a burial vault.